![]()
Lenscare for Fusion 帮助手册
由 JUNE 制作翻译
The purpose of Lenscare is to provide realistic camera-like out-of-focus and depth-of-field blurs. There are two main features that allow us to accomplish these effects.
请注意 — There are a few notable differences between the After Effects and the Photoshop version. The most obvious difference is that the version for Photoshop contains a single plugin which incorporates both Depth of Field and Out of Focus. The effect used depends upon whether the plugin is called with or without a selection. The Photoshop version also does not incorporate the background distortion feature and cannot use colored irises.
Simulation of different lens apertures
The iris describes the virtual camera’s lens aperture. This camera property has an important influence on how the camera’s blur will look. The aperture’s shape is especially apparent on small bright spots which can be emulated using ‘Highlight Selection’. The iris not only describes the lens aperture’s shape, but also describes light distribution within the camera’s lens. For example, a smudge on the lens can be simulated.
Highlight selection
Common graphic formats can only represent a limited range of brightness. Thus very bright spots and areas get clipped to this limited range. In order to achieve a correct camera blur the true brightness would be needed. That is because in a blurred image the brightness will be distributed to a larger area. When the bright- ness has been clipped, there is less intensity to be distributed and the resulting image will be too dark in those areas. This problem is especially apparent with small bright spots. Usually sharp highlights in the form of the iris should appear there. With ‘Highlight Selection’ it’s possible to recreate such spots.
Basic parameters in ’Out of Focus’ as well as in ’Depth of Field’. Groups of related parameters are from here on referred to as sub topics. There are four sub topics which are discussed in their own sections further below: ’Depth Buffer’, ’Iris’, ’Highlight Selection’ and ’Outside Image’.
(Out of Focus)

(Depth of Field)
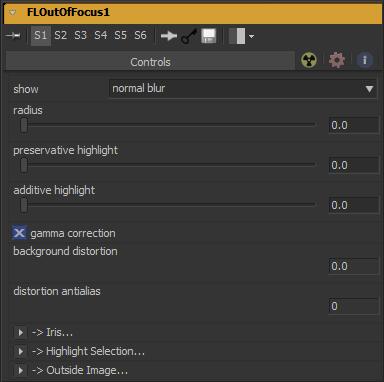
Here is an overview of the basic parameters:
> ‘show’
> ‘radius’
> ‘depth layer’ (Depth of Field only)
> ‘focal point/focus’ (Depth of Field only)
> ‘preservative highlight intensity’
> ‘additive highlight intensity’ (Out of Focus only)
> ‘select depth’ (Depth of Field only)
> ‘gamma correction’
> ‘background layer’ (Out of Focus only)
> ‘background distortion’ (Out of Focus only)
> ‘distortion antialias’ (Out of Focus only)
‘Show’ is the most important parameter that helps you to adjust all aspects of these plugins by providing appropriate feedback. It deserves a little extra atten- tion. It also lets you choose what the filter’s output will be. There are different possible outputs which help you to control the effect:
Here is a description of the different outputs:
‘normal blur’
The normal blur effect.
‘iris’
Shows the simulated lens aperture that is going to be used. The iris or lens aper- ture is one of the important factors in a camera that determines the look of the camera’s blur. The iris’ appearance can be adjusted in the ’Iris’ sub topic.
‘highlight selection’
Here you can see which areas are selected to be brighter than the rest of the image. For example, light sources should be selected so that these will be predominant in the resulting blurs. Selections can be adjusted in the ’Highlight Selection’ sub topic.
‘highlight selection only’
this is the same as ’highlight selection’ with the difference that the selected image areas are not shown but only the selection intensities.
Depth of field has two extra outputs:
‘depth buffer’
The map that is being used as a depth reference to calculate the effect. This is the most important parameter for the Depth Of Field filter and can be adjusted using the ’Depth Buffer’ sub topic.
‘info density’
This indicates possible defects and thus helps the user identify possible problem areas. All areas marked red potentially contain artifacts. The brightness of the red color indicates the increased likelihood of artifacts. You may ignore the areas of green color.
‘radius’
Describes the blur radius. For Depth of Field the blur size also depends on the depth buffer and the focal point parameter described below.
‘depth layer’ (Depth of Field only)
The layer that is used as depth map. Read the ’Depth Buffer’ subtopic for more information.
‘focal point/focus’ (Depth of Field only)
This is the depth value where the image will not be blurred and in thus be in focus.
‘select depth’ (Depth of Field only)
Select a point that you want to be in focus. The appropriate depth value will automatically be transfered to the focal point paramter. This parameter is not animateable.
‘preservative highlight intensity’
Describes how predominant the selected highlight areas will be, compared to the regular image. If only ’preserve highlight intensity’ is selected, the selected highlights will never be brighter than they are in the source image. This parameter applies only if highlights are enabled in sub topic ’Highlight Selection’.
‘additive highlight intensity’ (Out of Focus only)
Similar to ’preservative highlight intensity’ with an important difference. By using this parameter the selected highlights will be made brighter instead of preserv- ing their colors. You’ll see little difference if your selected highlight areas are maximum white only, but for darker or colored highlights, enabling this effect makes a real difference. Only applies if highlights are enabled in subtopic’Highlight Selection’.
‘gamma correction’
If gamma correction is turned on, the image will be transformed to linear space before any calculation takes place. Afterwards it is transformed back again. Usually this option should be turned on because it simulates what happens in a real camera. Blurred colors will look wrong otherwise. Turning this option off makes sense only if you know the image has been transferred to linear color space before or if you want to use the plug for blur gradients rather than simulating a camera.
‘background layer’ (Out of Focus only)
If you specify a layer here, it will be composed behind the current image. This parameter only makes sense in combination with the’background distortion’ parameter described below.
‘background distortion’ (Out of Focus only)
If the current image is semi-transparent and a background layer has been selected, it will be distorted by this magnitude. The distortion is dependent on the blurred image’s alpha channel. If you would like to use this feature for something else, it is possible to set the blur radius to zero. In that case, no blur calculation is performed and only this distortion feature is performed. That makes only sense if the current image contains a alpha gradient image.
‘distortion antialias’ (Out of Focus only)
Usually you will want to apply only a little distortion, so only a small amount of anti-aliasing is needed. For greater distortion, or if you feel that the distortion needs some extra anti-aliasing, you can add some here.
If you use Lenscare for the first time you might want to read this short how-to chapter. It will describe all the basic parameters and how they affect your image.
Out of Focus:
When applying ’Out of Focus’ the first thing you should do is to select the look of your virtual cameras aperture (iris). Change the ’show’ parameter to ’iris’ and adjust it to your needs. This is done using the ’iris’ sub topic. If you feel like the image needs some highlights or a brightness boost, you should switch ’show’ to ’highlight selection’ and select the desired areas as described in the ’Highlight Selection’ subtopic. Now you are ready to adjust the basic parameters.
After you are satisfied with those settings you may want to apply some distor- tion onto a possible background image. This is only possible for images with transparency. In order to do so it is necessary to set the ’background layer’ to the desired footage. That layer will then be blended with the current image as if the layer would be placed in the composition behind that current image. Now set ’background distortion’ to the desired distortion strength. Start with a high value to see how the image gets bended in the semi transparent areas.
Depth of Field
When applying ’Depth of Field’ the first thing you should do is to select the ’Depth Buffer’ you want to use and adjust it.
You should first select the ’show’ option ’depth buffer’. If there is a depth channel associated with the footage (i.e. the footage is an RLA file) it will automatically be extracted and used as depth buffer. This way you don’t have to waste an extra layer on the depth buffer. The extracted depth buffer should be adjusted using the ’black point’ and ’white point’ parameters in the ’depth buffer’ subtopic. Try ‘auto’ first to let the filter determine the correct values, this should do the job most of the times. If there is no depth buffer attached to the image you will have to select one manually from the ’depth buffer’ layer parameter. Otherwise a monotone black depth buffer is assumed.
重点 — Depth Of Field assumes that white pixels in the depth buffer indicate pixels closest to the camera and black pixels the ones being most distant (check in depth buffer show option). So if you have a depth map that is rendered the other way around, you should adjust it using the ’invert’ option in the ‘depth buffer’ subtopic. If you don’t do so the effect will be calculated with wrong opac-
ity assumptions and look wrong.
Once you have the depth buffer adjusted you should switch the ’show’ parameter to ’iris’ output and adjust it to your needs using the ’Iris’ sub topic. If you feel that the footage needs highlights or some areas a brightness boost, you should switch ’show’ to ’highlight selection’ and select the desired areas in the ’Highlight Selection’ sub topic.
Now you are ready to adjust the Depth Of Field itself. Before switching ’show’ to ’normal blur’ it makes sense to decrease resolution for preview because Depth Of Field can be very slow with the ’wrong’ settings. Normal plugins usually take four times longer to calculate a image with doubled resolution. Due to its complexity, this is not true for Depth Of Field. Doubling the resolution increases Depth Of Field render time roughly by a factor of eight (yes, Ma’am, eight)!
请注意 — This applies to the Depth Of Field effect only. To calculate the effect, a depth buffer is needed. It describes the distance to the virtual camera for each pixel. It can either be painted by hand for photos and drawings or if the image has been rendered the raytracer can be used to render out a nice exact depth map.
重点 — There are anti-aliasing issues that you should be aware of. Please read the discussion about it inthe Tips’N’Tricks section.
The layer that is being used as depth buffer can be selected from the ’depth buffer’ parameter. Because that parameter is so important it was not placed within this subtopic.
重点 — Depth Of Field assumes that white pixels in the depth buffer indicate pixels closest to the camera and black pixels the ones being most distant. If you have a depth image that is rendered out the other way around you should adjust it. Use the ’invert’ option in this subtopic. If you don’t invert it, the effect will be calculated with wrong opacity assumptions and will look wrong! Typical glow effects around depth borders will appear.
请注意 — Depth Of Field can have a maximum of 256 different blur levels. Even if you work with 16-bit images, there will be a maximum of 256 different blur levels. Initially, this may sound like a serious quality restriction, but we have never experienced artifacts that would be related to this constraint. Compared to the apparent problems with 8-bit color channels, an 8-bit blur resolution is much less troublesome due to the nature of a blur.
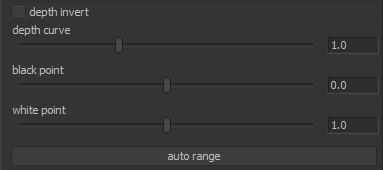
Here are the parameters of the depth buffer sub topic:
> ‘invert’
> ‘curve’
> ‘take depth from’
> ‘black/white point’
> ‘auto range’
‘invert’
Simply inverts the depth buffer. White parts will become black and vice versa. This is important if you want to apply a depth buffer where black points indicate front parts. Depth Of Field assumes white points to indicate front pixels.
‘curve’
Can be used to adjust the brightness curve of the depth buffer and thus the blur distribution within the image. If you need more sophisticated adjustments you should apply external filters like ’Curves’ to the depth map.
‘take depth from’
This lets you choose which channel of the selected layer is to be used as the depth buffer.
‘black/white point’
If there is a depth channel attached to the current footage, it will be used as default depth channel. RLA files, for example, can have depth channels attached to them. You can of course override this depth information with a different layer using the’depth buffer’ parameter.
Use these parameters like they are being used in After Effects’ ’3D Channel Extract’. ’Black point’ indicates which depth values from the external channel is to be considered black. All depth values further away are clipped to black. ’White point’ acts accordingly. The values in between are mapped to the available gray scale values.
‘auto range’
If there is an attached depth channel for the current footage, this parameter will auto adjust black/and white point paramters to the minimal and maximal deth values in that channel. Manual adjustments might still be needed in order to get the highest possible depth contrast.
The iris describes the virtual camera’s lens aperture. This camera property has an important influence on how the camera’s blur will appear. Lenscare offers the possibility to model or even replace this iris (in Out of Focus only).
(Out of Focus)
(Depth of Field)
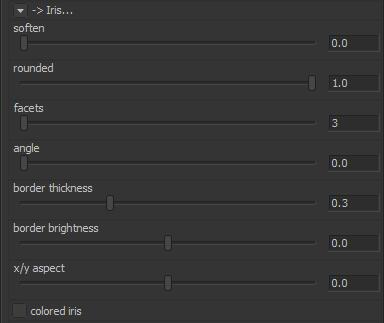
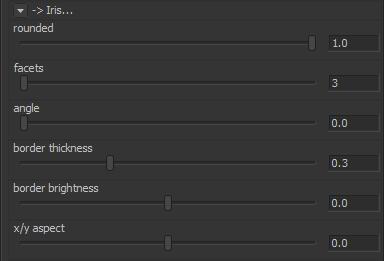
Here is a description of the ’Iris’ subtopic parameters:
> ‘alternative iris’ (Out of Focus only)
> ‘colored iris’ (Out of Focus only)
> ‘facets’
> ‘angle’
> ‘rounded facets’
> ‘x-y aspect’
> ‘relative border brightness’ and’border thickness’
> ‘smooth’ (Out of Focus only)
‘alternative iris’ (Out of Focus only)
Various iris forms can be generated with the parameters in this subtopic. However, sometimes it is desireable to draw a custom lens aperture. ’Alternative iris’ can be used to override the generated lens with your own lens.
‘colored iris’ (Out of Focus only)
For the sake of speed the’alternative iris’ will usually be transformed to a black and white image before being used. To account for colors, turn this option on. Interesting results can be achieved using colored lenses. Try using a color wheel, for example.
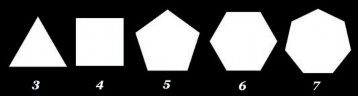
‘facets’
Determines the number of facets or blades of the lens aperture.
‘angle’
Rotates the iris around its center.
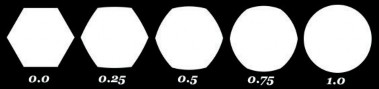
‘rounded facets’
Rounds off the facets. 1.0 will result in a disc where 0.0 will result in a pure polygonal like form and 1.0 in a sphere-like shape.
‘x-y aspect’
Changes the x-y proportions of the iris. Some high quality cameras have oval lens apertures. This parameter can be used to emulate those camera types.
‘relative border brightness’ and ’border thickness’
These two parameters let you add a border around the iris which is different in intensity from the inner iris. A similar brightness distribution is often found in real cameras.

‘smooth’ (Out of Focus only)
Applies a blur to the iris.
Lenscare offers the ability to compensate for the problem of missing brightness information. Using this sub-topic, areas can be selected and given a boost. Based on the footage you can select brightness ranges.
In After Effects it is possible to select hue and/or saturation ranges. It is also possible to base these selections on a different layer.
The following is a description of the available parameters:
> ‘enable’
> ‘alternative selection layer’
‘lightness’
> ‘start/end’
> ‘climax’
> ‘soften’
> ‘offset’
> ‘hue/saturation’
‘enable’
‘Highlight Intensity’ will only be available if ’Highlight Selection’ is enabled.
‘alternative selection layer’
If you want to base your selection on another layer, use this parameter to select that layer. All the other parameters still apply, they will just work based on the selected layer rather then the image the filter is applied to.
重点 — Note that the selected mode remains the same. When you load in a layer, not the layer’s absolute values are used but rather how you select them.
For example, if you select a grayscale image you might expect the selection to correspond to the grayscale values. In fact, to get the desired result you have to select everything (start and end set to 0 and 255) and set lightness climax and soften to 1.0. It might take some practice to get used to this selection method, but once you know how it works, you will hopefully appreciate the extra flexibility.
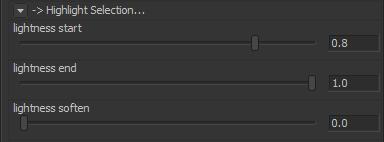
‘Lightness’
> ‘lightness start’ and ’lightness end’
Mark the lower and upper brightness threshold. Everything in between will be visible.
> ‘lightness climax’
Refers to soften parameters and only takes effect if’lightness soften’ is not zero. This marks the relative position in between start and end which is not influenced by soften.
> ‘lightness soften’
Darkens the selection relative to the climax position.
> ‘lightness offset’
Offset value for’lightness start’ and’lightness end’.
To fully understand climax, soften and offset it is best to load in a black to white gradient and play around with these parameters. This will allow you to quickly get a feel for each control. The parameters for hue and saturation work the same way as those for the lightness parameters.
Hue
> ‘hue start’
> ‘hue end’
> ‘hue climax’
> ‘hue soften’
> ‘hue offset’
Saturation
> ‘saturation start’
> ‘saturation end’
> ‘saturation climax’
> ‘saturation soften’
> ‘saturation offset’
This sub-topic describes what is assumed outside the image.
The following is a description of the parameters:
> ‘horizontal/vertical assume’ | ’outside image’
> ‘outside color’
> ‘outside color alpha’
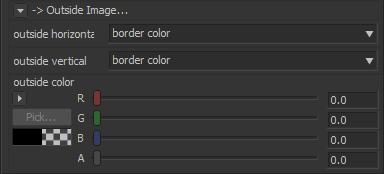
‘horizontal/vertical assume’ | ’outside image’
These parameters determine what is assumed outside the current image and changing it will only result in changes at the borders. Note that in Photoshop there is only one parameter for combined horizontal and vertical behavior. Here are the possible values:
> ‘border color’
the image’s border colors are assumed to continue on the outside
> ‘mirrored image’
a mirrored image is assumed on the outside
> ‘repeated image’
a repeated (tiled) image is assumed on the outside
> ‘color’
the color specified below will be assumed outside
‘outside color’
If ’color’ is chosen in horizontal or vertical assume, this color is assumed outside.
‘outside color alpha’
Describes the outside color’s alpha value.
Depth of Field speed considerations
Out of Focus speed considerations
To anti-alias or not to anti-alias
Depth of Field quality considerations
Out of Focus quality considerations
Depth of Field looks wrong
Depth of Field has strange artifacts on depth borders
Depth of Field speed considerations
As a rule of thumb the time needed to calculate a frame depends on the aver- age blur radius and image size. Another slowing factor is the shape of the Iris. If ’relative border brightness’ in the Iris sub topic is not zero, the render time will increase.
When ’Highlights Selection’ is enabled, speed will also drop somewhat. There is no ’low quality’ speed gain because results for low and high quality are abso- lutely equal. Normal plugins usually take 4 times longer to calculate a image with doubled resolution. Due to its complexity, this is not true for Depth Of Field. Doubling the resolution increases Depth Of Field render time roughly by a factor of 8! It makes sense to decrease resolution in preview mode.
Out of Focus speed considerations
Speed is mostly (!) independent of the blur’s radius. A ’colored Iris’ in the Iris sub topic will increase render time as well as an enabled ’Highlight Selection’. Another factor that increases render time is enabling refraction by selecting ’blend layer’. The algorithm’s implementation makes speed virtually uniform over wide ranges of image sizes and takes sudden jumps on certain image size levels. These levels are all powers of two, e.g. there is a great difference between a image sized 950x950 and 1050x1050. [2^10 = 1024]. We hope to be able to reduce this rendering differential in future upgrades. There is no ’low quality’ speed gain because results for low and high quality are absolutely equal.
To anti-alias or not to anti-alias, quality considerations
Anti-aliasing is a topic that needs special discussion for ’Depth of Field’. The restriction is that the depth buffer cannot be anti-aliased. If the depth buffer were anti-aliased, any gray values in between the black and white areas would indicate wrong depth values and would thus result in artifacts. Conversely, when there is no anti-aliasing on the depth buffer but there is anti-aliasing on the image, then those two images don’t match exactly, which results in more or less visible artifacts. One way to deal with the second problem is to render in doubled resolution, apply Depth Of Field and then resize back to normal resolution. In order to reduce the rendering time for the raytracing, it is possible to decrease anti-aliasing on the image by the same factor the resolution has been increased. For example, if 16 times oversampling is enabled with a doubled resolution only
4 times oversampling is needed.
If you already rendered out your image in normal resolution it is acceptable to increase image size in After Effects and render out only the depth map in doubled resolution. Then use that z-buffer to apply Depth Of Field on the bigger resized image.
Here is a comparison of an image rendered in single vs. doubled resolution.
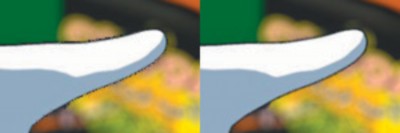
Depth of Field quality considerations
The best way to improve quality for Depth of Field is to read the ’To anti-alias or not to anti-alias’ topic above. Apart from this, there are inherent problems with any depth of field post-processing solution. A serious problem is missing information: information that is occluded in the 2D image and would be needed in order to generate a completely correct Depth Of Field effect. In order to help the user identify those areas, Depth of Field provides a ’Show’ mode where those areas can be identified. This mode is named ’info density’ in ’Show’ and using it can simplify the identification of possible problems. Red areas indicate missing information. The brighter the red color is, the more likely problems are to occur. Areas of green color can be ignored. If artifacts are to apparent you might want to render in layers and apply multiple blurs.
Out of Focus quality considerations
If you take advantage of the distortion feature there is the possibility to increase anti-aliasing for that refraction effect. This is usually not needed and probably only useful for very high refractions.
Depth of Field looks wrong
Try setting ’invert’ in the ’Depth Buffer’ sub topic. When looking at the depth buffer, you need to make sure that pixels closer to the camera need to be lighter then more distant once. Otherwise the plugin will perform opacity calculations with wrong assumptions.
Depth of Field has strange artifacts on depth borders
Check the used depth map. It may NOT be antialiased. If the depth buffer was antialiased, any gray values in between the black and white areas would indicate wrong depth values and would thus result in artifacts. Try rendering out your depth buffer again with no anti-aliasing.
本手册实例部分的图片是有版权的,我们要感谢提供者的支持。
场景加了景深后,如何再让光斑明显一些呢?(虚焦、散焦)
Arnold 渲染Z通道 出现变白的问题(景深、去颗粒)
Frischluft Lenscare景深插件在Fusion里好像没ae做的好?怎么回事?
关于Frischluft Lenscare 景深控制范围的问题
FL插件虚化不了了,是什么问题?
FL景深插件如何制作变焦动画
景深插件 Lenscare OFX版在Fusion里没找到?
其他相关答疑